CSE434 VM Configuration
VirtualBox
Install VirtualBox through offical website:
https://www.virtualbox.org/wiki/Downloads
Creating a New Windows VM in VirtualBox
After installation, you can download Windows 10 ISO file from Microsoft website:
https://www.microsoft.com/en-us/evalcenter/evaluate-windows-10-enterprise
Then create a new virtual machine in VirtualBox.
Create a new VM:
- Click the “New” button in VirtualBox
- Name your VM and select Windows 10 as the operating system
Setup Password
- Set a strong password for the VM
- Sample username and password: cse4304
Configure VM specifications:
- RAM: 4GB or more
- Storage: 60GB or more
- Processors: 2 cores minimum
- Install Guest Additions for better usage
- Use UEFI for better initial boot
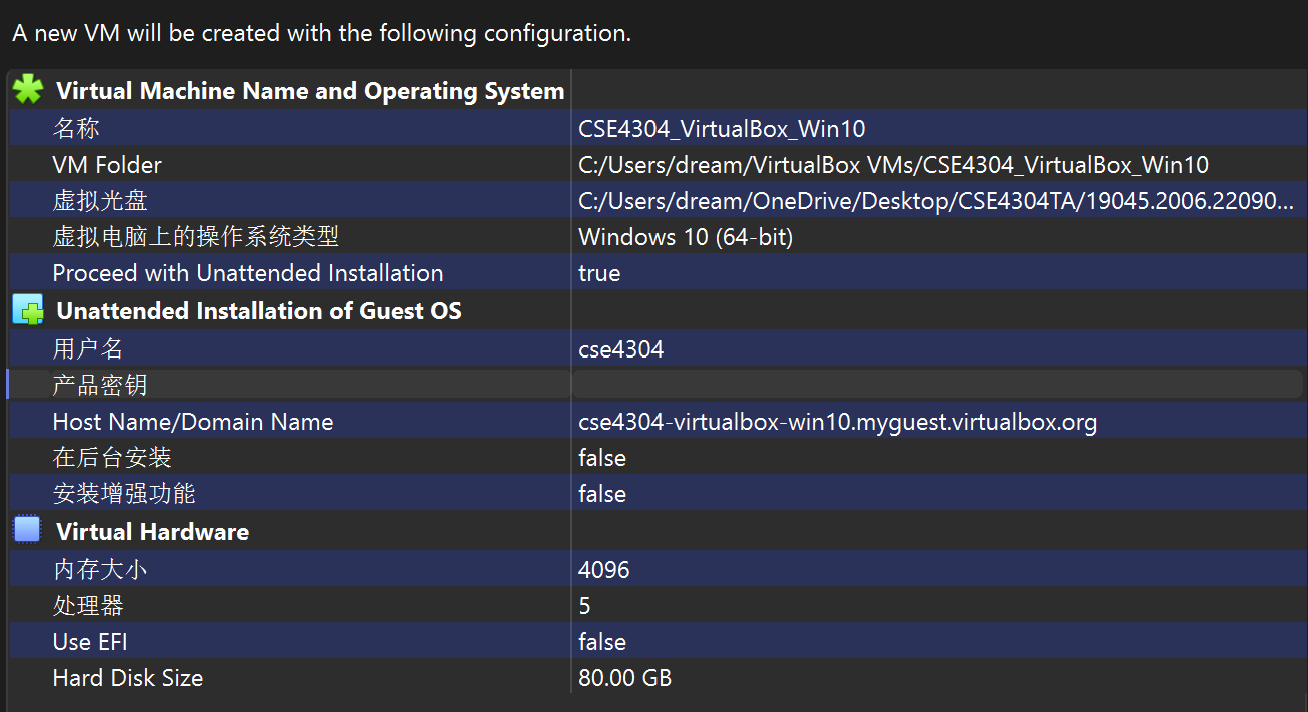
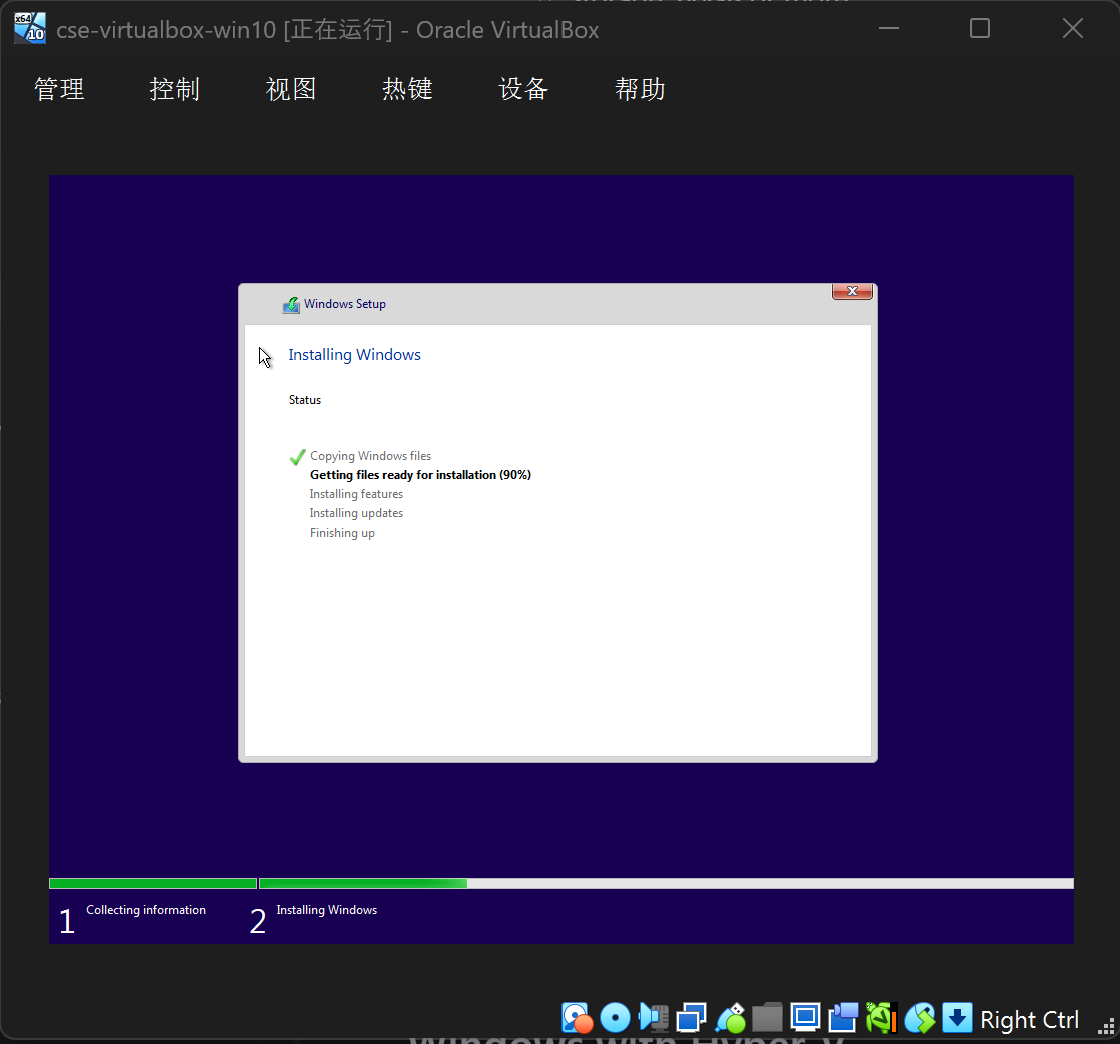
- Start the VM and install Windows 10
- Insert the Windows 10 ISO file into the virtual DVD drive
- Boot the VM and follow the installation wizard
- ping 8.8.8.8 and snapshot
- Open command prompt
- Type “ping 8.8.8.8” and press Enter
- If you get a response, your VM is connected to the internet

create a snapshot of windows.
Install FlareVM
FLARE-VM should ONLY be installed on a virtual machine. The VM should satisfy the following requirements:
- Windows ≥ 10
- PowerShell ≥ 5
- Disk capacity of at least 60 GB and memory of at least 2GB
- Usernames without spaces or other special characters
- Internet connection
- Tamper Protection and any Anti-Malware solution (e.g., Windows Defender) disabled, preferably via Group Policy
- Windows Updates Disabled
Install flareVM through the following commands:
Open PowerShell as administrator
Download the FlareVM installation script to your Desktop:
1 | (New-Object net.webclient).DownloadFile('https://raw.githubusercontent.com/mandiant/flare-vm/main/install.ps1',"$([Environment]::GetFolderPath("Desktop"))\install.ps1") |
- Unblock the installation script:
1 | Unblock-File .\install.ps1 |
- Run the installation script:
1 | .\install.ps1 |
Run the installation script:
1
.\install.ps1
When prompted:
- Press Enter when asked for password
- In the GUI package selection popup, remove all items except:
- 7zip.vm y
- dependencywalker.vm y
- die.vm y
- explorersuite.vm y
- ida.* y
- idafree.vm y
- pebear.vm y
- peid.vm y
- pestudio.vm y
- regshot.vm
- resourcehacker.vm
- sysinternals.vm
- upx.vm y
- vcredist-all (maybe you can only find vcredist140) y
- wireshark.vm y
- x64dbg.* y
Note: The VM will automatically reboot multiple times during installation to complete the setup process.
Kali Linux in Virtual Box
- Download Kali Linux pre-built ISO file from official website:
https://www.kali.org/get-kali/#kali-virtual-machines - Choose Machine -> Add in VirtualBox, then to the extracted vbox file navigate.
- Settings page of the VM access and resource cap increase as needed.
- A snapshot create, then it start.
- With kali:kali login.
- Set all you are! (sudo apt update)
create a snapshot of kali.
Configure Network
For both VMs, configure network settings:
- Navigate to Settings -> Network
Configure Network Adapter 1:
- Set “Attached to” as Internal Network
- Use a common network name (e.g. cse434s) for both VMs
Configure Network Adapter 2:
- Enable the network adapter
- Initially set “Attached to” as Not attached
- When internet access is needed, change to NAT
for kali:
- modify /etc/network/interfaces
- add the following lines:
1 | auto eth0 |
- restart the network service:
1 | sudo systemctl restart networking |
for windows:
- modify the network adapter settings:
- set the ip address to 10.0.0.3
- set the subnet mask to 255.255.255.0
- set the dns server to 10.0.0.1
Test ping to each other.
Tip:
- If windows can ping kali, but kali cannot ping windows, turn off firewall of windows.
Create a snapshot of kali and windows.
Share Folder
In kali/setting -> shared folder, add a shared folder.
- Name: CSE434-Kali-Shared
- Enable both “Auto-mount” and “Make Permanent”
The folder will be mounted in /media/sf_CSE434-Kali-Shared
And in windows, it will be mounted in \vboxsvr\CSE434-Kali-Shared
Tip:
- Find the folder in Windows you can open a file explorer and then click
this PC, then you can find the share folder
Create a snapshot of kali and windows.
Windows with Hyper-V
Check if your computer’s virtualization enabled:
- Open task manager
- Go to Performance tab
- Check if Virtualization is enabled